

I've been stamping my nails for almost a year now, and I want to share some tips&tricks with anyone who could benefit. I'm by no means an expert and I see much better and creative konad manicures every day, but I also watch tutorials time to time and see some details which could be misleading. If you've came across one of those tutorials and ever wondered why your images didn't come out as they should be, maybe this post could be helpful to enlighten some points.
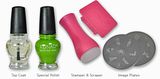
- Try to use a plastic scraper. If you don't own the Konad plastic scraper, use a plastic card, like an expired credit card. I don't own the plastic scraper, either, and never had issues with a plastic card. Cut one card in half and there you have a scraper. At least now you're not going to stratch your plate.
- Take out your desired polish and dab some on one end of the desired image. You don't have to go all over the image with polish. It's a waste of product, since most of the polish is not going to be used. Scrape all the way along the image, and the polish will be evenly spread. You can even grab some of the excess polish on your image plate holder with the scraper, and run it all over the image to cover it again. Note: The last one works best with Konad polishes. Other polishes have different nature, they dry quickly. But painting all over the image is not necessary with any polish I've used. Of course if you wanna waste product, that's your choice =)
- Don't hold the scraper vertically, and don't push hard to scrape. Instead, hold the scraper in a 45 degree angle, and lightly scrape the plate. If you push too hard, you'll wipe away the polish from inside the image and the image will be gappy and not complete.
- Get your stamper. The stamper should be clean, but not wet with polish remover. Press one side of the stamper on the plate, and gently roll to cover the whole image. Don't go down directly and push hard on the image. Push the stamper firmly on the image, make sure all the image is covered with the surface of the stamper. If your stamper is clean but doesn't pick the image, rub its surface with a buffer, or like me, with a rough cloth. This will make the polish stick to the stamper.
- Put your nail on a flat surface, and push the stamper again, firmly, in a rolling motion. You don't have to push too hard, just be sure that you roll all over the nail, and only once. Don't push down from the top, don't go in rocking motion, just roll gently but firmly. Pushing too hard might double the design, pushing too light might leave it on the stamp. You will find the right pressure after a few times. Rocking the image might misalign the image, and pushing down can leave some parts blank, failing to transfer the edges.
- The image should be on your nail now. If the image is not complete on the stamper in the first place, start over. Practise until you can transfer the image to the stamper. If you transfer well on the stamper, there is no reason for you to be unable to transfer on the nail =)
- After stamping the nail, don't wipe the stamper with remover. Just stamp the stamper on the hard plastic surface of the plate holder, and the image should come off. Wiping regularly makes the stamper surface slick and reduces friction, which is key to transferring images. Wipe only when bits of polish won't come off.
- Clean the image plate with a cotton ball when images start to get "clogged". This happens mostly with other brands, since they dry early. Konad polishes don't dry on their own, I can go through ten nails without wiping most of the time. But with other brands, you need to wipe regularly. Make sure you dry the plate with a cotton ball afterwards.
- There are different polishes that work with Konad, but if you're using a polish other than Konad special, you'll have to rush. Other brands dry very quickly, especially with layers this thin. After dabbing the polish, you literally have to scrape, push the stamper and transfer within 3 seconds. But this shouldn't be very hard after finding your own rhythm. But I recommend starting with konad polishes, as you can be slower with them and that they're more forgiving. But even with konad polishes, don't wait about 10 seconds. Because they dry after a while, too.
- First make a decision in your head, then do the stamping. If you wait with the stamp in your hand, unable to decide where to put a pattern, you will most likely end up with half of the dried image, and hate the thing altogether =)
- If you made a mistake, grab a cotton ball and soak it with remover. Go lightly over the design. It should remove, as long as you have topcoat underneath. If you don't put on topcoat before stamping, I advise you to start doing so, because it could be a life saver. After finishing the manicure, you will put another topcoat, which will hide the dullness, so don't worry.
- In order to avoid smudging, use Konad topcoat, or if you want to use your regular topcoat, just get a big amount on your brush, and spread evenly, from root to tip, without touching the brush on the nail. Go with light strokes, and only once over every section of nail. Let dry, and then do a proper topcoat.
- Finally, don't give up! It's not rocket science, it's a very easy and fun thing to do, and possibilities are endless =) I once saw a woman who tried to return her professional salon kit, because she thought she couldn't do this. She had tried every single color, and she didn't even clean the plates, she was just demanding her money back. I was eyeing her like O_o with only 3 first plates and 2 mini polishes in my hands. I mean everybody can do this. Just sit at it for an hour, and try, and don't give up. I remember my first time =) It was a fiasco! But I got the hang of it and now it's one of my favorite leisure activities =)

Bonus tips from readers:
Kirsten:
- If you see parts of the image sticking up off your nail right after stamping, carefully press them on the nail with as little contact as possible before you proceed. (This happens with non-Konad polishes, like Romantiques.) These parts will cause your image to smear when you use the topcoat. Don't rub, just lightly press them down.
- If you haven't mastered Konad yet, play with it over old mani's. Nothing frustrates more than ruining a good mani. (Yeah, me too =) And not only try the stamping, but practice putting a topcoat over it, too. Go crazy, use bold designs, regular polishes, experiment with angles, pressure, double stamping etc.
Over an old mani it doesn't matter what you do but it can give you inspiration and it helps you find a way that works for you without the frustration of ruining a perfectly good mani.
")
 Site URL
 E-Mail


.JPG)


.JPG)


Great article. I haven't got my kit yet but expecting it for a Christmas present so I'm doing research and watching videos etc. now. :)
ReplyDeleteI'm confused about the scraper. Is it not ok to use the one that comes with the kit?
I'm getting this one:
http://cgi.ebay.com/ws/eBayISAPI.dll?ViewItem&item=270466520246#ht_2174wt_939
I've never seen anyone put polish on just part of the image and then scrape. Makes sense so I'll have to give it a whirl.
Great job and this is getting bookmarked. :)
Susie
Very handy!
ReplyDeleteI see i'm doing some mistakes, like passing the remover in the stamp everytime i stamp in the nail. Maybe that's why sometimes didn't work...
Always learning!
Kiss
Great tips! Not annoying at all! I know a lot of people struggle with konad. If it's OK with you I'm going to link to your post on my blog.
ReplyDeleteIf you don't mind me adding to your tips:
- if you see parts op the image still sticking up off your nail right after stamping, carefully press them on the nail with as little finger<>nail contact as possible before you proceed. These parts will cause your image to smear when you use the tc. Don't rub, just lightly press them down.
- If you haven't mastered konad yet, play with it over old mani's. Nothing frustrates more than ruining a good mani. And not only try the stamping but practice putting a tc over it too. Go crazy, use bold designs, regular polishes, experiment with angles, pressure, double stamping etc.
Over an old mani it doesn't matter what you do but it can give you inspiration and it helps you find a way that works for you without the frustration of ruining a perfectly good mani.
Great post. I'm hoping it will help me get with time. Kudos.
ReplyDeleteHaha, I like your picture! "No!"... "Yes"... I'm guilty of painting the whole design. I'll try it your way if I can get it to work!
ReplyDeleteAlso, I always have trouble getting the image to stick on the tips of my nails. It's because my nails curl down a little bit so I end up having to rock the stamper. Ugh, and then I get the doubled image! I think that is just a lose-lose situation for me.
One last thing... I have metal AND plastic scrapers. I don't think the plastic one scrapes off all of the excess paint BUT my plates are getting really scraped up from the metal ones! Another dead-end for me!
Very good post! This will help a lot of begginers. =) I love it!
ReplyDeleteThank you for the feedback, guys! =)
ReplyDeleteSusie, the scraper that comes with the kit naturally works, but my concern is that metal scrapers stratch the surface of the plates. I couldn't make out from the picture, but it looks like it's the plastic scraper you're getting. I recommend a plastic card, because the size is bigger and it scrapes as good as a konad scraper.
Covering the whole image really doesn't make sense =) Oh, how much of the product is getting wasted this way! There is really no need. Thank you for bookmarking =)
Trinca-Espinhas, if you feel the need to wipe the stamper everytime, make sure you rub it on a piece of dry cloth afterwards, to get rid of the slickness. It works this way, too =)
Kirsten, thanks for the tips! They are getting added =) It's perfectly OK with me that you link to this post!
PH, it definitely works after some practise =) For the tips, try not rocking, but clearly starting on one end and ending on the other. Does it not work this way? I can't imagine you having a problem after seeing your nails =D
And why don't you try a credit card? It definitely scrapes all the excess paint. If it doesn't, go quickly over again, and it will be definitely scraped this time =) If you mean the thin layer of polish that lingers sometimes, I just go over the design in the same way, and it's gone =)
Thank you L and Sasha, glad you found it useful!=)
Great tips! Thank you for writing them down. I always thought one MUST go over whole design with plenty of polish so I'm really happy to hear you can make pretty designs without wasting polish :D
ReplyDeleteThanks, Doo! That's really a polish-saver, it works just as well when right amount is dabbed on one end =)
ReplyDeleteGreat tips! Just found you bog, you do amazing konadicures:) Love your nails<3
ReplyDeleteAww thank you so much! I love your blog, it's one of my favorites! <3
ReplyDeleteYes I agree this is a Great post! , thanks for sharing your knowledge :)
ReplyDeleteYou're very welcome =)
ReplyDeletesuper et très bien expliqué
ReplyDeletemerci et j'adore ton blog
super and very well explained
thank you and I love your blog
Merci beaucoup! Ha, I understood everything =DDDD
ReplyDeleteThank you so much! =))) <3
Very interessting. :-)
ReplyDeleteThanks =)))
ReplyDeleteI just bought Konad plates and used this as a bible to start. I dont think it went too badly for my first go. Now i just have to master it before I try out your manicure that's inspired by your earrings. Any tips for using non-Konad polishes? I tried using OPI for the first try and i found it comes out almost transparent (it was a dark gold). Should you let them dry a wee bit before transferring the stamp? Thanks for the tips!
ReplyDeleteHello Niki! I hope my little guide helped you. As for non-konad polishes, I suggest you to use polishes that are opaque in just one coat. Like China Glaze Khromes, Romantiques, and colors that give color payment in one thick coat. The OPI you tried probably had a sheer base, don't let the gold shimmer deceive you. The metallic polishes I mentioned work great, even much better than gold/silver polishes of Konad itself. And as for your second question, you have to do the opposite. Never let them dry, you will only cause them to stick to the stamp, and they won't transfer! You have to work pretty quickly, because such thin layers of polish tend to dry in seconds.
ReplyDeleteHere is a list of polishes that work awesome with Konad, thanks to Sasse:
http://sassestampingstampede.wordpress.com/polish/
Just read this, and it is awesome...to see it all in one place is GR8!
ReplyDeleteTo get my design straight, I made a mark on the edge of my stamper. Then I always make sure the mark is at the bottom or "6 o'clock" when I roll it off the plate, and in the same spot relative to my cuticle when I roll it on the nail. Not perfect, but a lot better than what I was getting before.
ReplyDeleteThanks for your great post!
Yay, finally I know what I've been doing wrong and, as you said, it wasn't clear to me from the tutorial I've watched.
ReplyDeleteGo you :) !
I'll start practicing, practicing, practicing as soon as my next mani gets old.
I was recommended this blog by my cousin. I am not sure whether this post is written by him as
ReplyDeletenobody else know such detailed about my problem. You are wonderful!
Thanks!
My homepage how to buy a car with bad credit
My site :: how to buy a car,buying a car,buy a car,how to buy a car bad credit,buying a car bad credit,buy a car bad credit,how to buy a car with bad credit,buying a car with bad credit,buy a car with bad credit,bad credit car loans,car loans bad credit,auto loans bad credit,bad credit auto loans,buying a car bad credit loans,bad credit loans cars,buying a car and bad credit,how to buy a car on bad credit,buying a car on bad credit,loans for cars with bad credit,auto loans for bad credit,buying a car with bad credit,how to buy a car with bad credit
Thanks for the tips, I've been having trouble getting the bigger image to transfer smoothly to my nails, so am going to try your tips as there's some I haven't tried.
ReplyDeleteI'm very disappointed bcoz it doesn't work 4r me :-(
ReplyDelete